
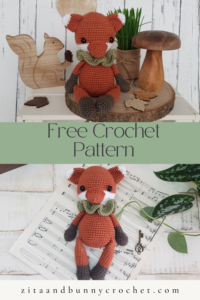
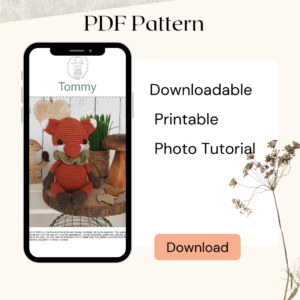
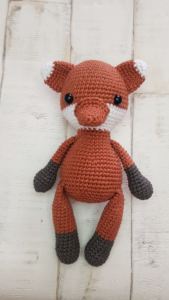
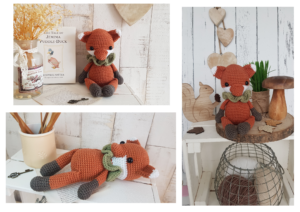
Do you want to make some cute crochet gift for a little boy? Tommy, this little crochet fox is the perfect idea. He is cute, sweet, cheeky and easy to make.
Pin it now, make it later!
My crochet fox, Tommy is very close to my heart. I love forest animals and since I started crocheting I always wanted to make the perfect fox. During the last 3 years, I purchased many patterns but none of them were up to my expectations.
I was working on this pattern for about 2 years! (yeah you read it well)
The reason behind this is because I am a perfectionist and nothing was up to my standards.
When I decided to make this blog I knew I had to crochet a fox and I also knew I wanted to name him after my son. His name is Tamas and he named this fox officially Tommy Innit (East Londoners we are!).
Having my son in my head while designing this fox I came up with this cutie within 2 days! Not too bad after 2 years of trying. My son gave me the best inspiration I could have.
The story of Tommy, the little fox:
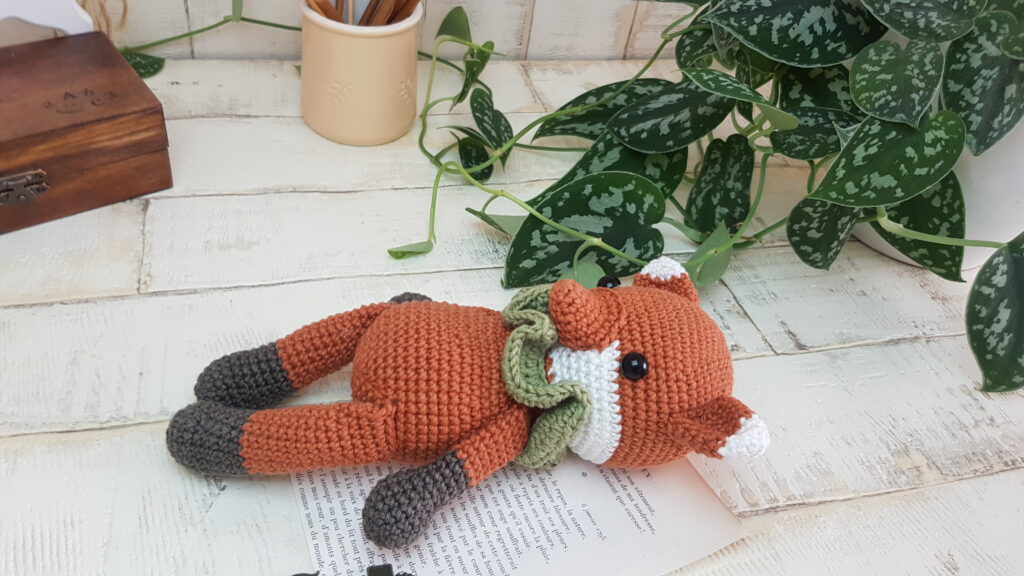
Tommy, this little fox is very cheeky, and playful. He likes to jump and run, and sing long in the bath. This sweet crochet fox makes funny jokes, laughs out loud and he also cuddles his Mum unexpectedly, just because.
I hope Tommy will bring you as much joy as it does for me. If you crochet this fox, please share it with me.
Caution!
Please be very cautious when you make toys for babies or children under the age of 3. If you sew parts on it, make sure they are secure and safe.
I recommend, to embroider the eyes, as the plastic safety eyes can be dangerous. My tutorial for embroidery eyes can be found here
|
All Zita and Bunny designs are original. Sales of the finished items are encouraged, but please give credit to the designer. Copyright © 2021 by Zita Renata Elek (Zita and Bunny).All rights reserved. This pattern is for personal use only. No part of it may be reproduced, resold, translated, published, altered, shared or posted in any way. |
**This blog contains affiliate links for products I use, believe in, or recommend. This means I will earn a small commission if you make a purchase from one of their links, and of course it is at no extra cost for you. It helps me to keep Zita and Bunny going and to keep publishing free patterns for you. You can check my full disclosure here. **

Abbreviations:
sc – single crochet
hdc – half double crochet
inc – increase
dec – decrease
MR – magic ring
ch – chain
FLO – front loop only
BLO – back loop only
st – stitch
sts – stitches
sl st – slip stitch
(…) – repeat instruction for the amount of time given
Materials you need for this fox:
Affiliate links for the US:
1. Cotton yarn,
I used:
A – Schachenmayr Catania 426 – Fuchs
B – Schachenmayr Catania, 106 – Weiss
C – Scheepjes Catona, 387 – Dark Olive
D – Safran 60 – Moss
3. Safety eyes, 9mm
5. Scissors
7. Pins
8. Stuffing
9. Button – 12mm
Affiliate links for the UK:
1. CottonYarn:
A – Schachenmayr Catania 426 – Fuchs
B – Schachenmayr Catania, 106 – Weiss
C – Scheepjes Catona, 387 – Dark Olive
D – Safran 60 – Moss Green
5. Scissors
7. Pins
8. Stuffing
9. Button – 12mm


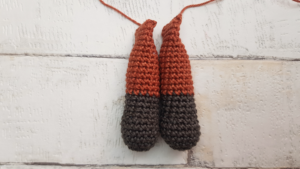
Legs: (make 2)
Start with Dark Olive yarn
1: 6sc in a MR
2: (inc) x6 [12]
3: (sc, inc) x6 [18]
4 -6: sc in every st around [18]
7: 3sc, dec, 2sc, 2dec, 2sc, dec, 3sc [14]
8 – 11: sc in every st around [14]
In last stitch, change to main colour
12 – 19: sc in every st around [14]
Staff the leg, do not stuff the rest
20 – 21: sc in every st around [14]
22: (5sc, dec) x2 [12]
23 -24: sc in every st around [12]
25: sc in each of next 2 sts, so the 2dec we did in row 7 will be the front of the leg. If you need to make more sts do so.
Press both layers of legs together so that they lay flat on top of each other, aligning the stitches side by side. sc together the opposite stitches. I put 5sc. Fasten off yarn, leave a long tail to sew.
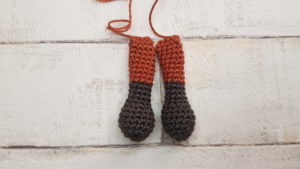
Arms: (make 2)
Start with Dark Olive yarn
1: 5sc in a MR
2: (inc) x5 [10]
3: (sc, inc) x5 [15]
4 -7: sc in every stitch around [15]
8: (sc, dec) x5 [10]
stuff the arm up to this point, do not stuff the rest
9 – 12: sc in every st around [10]
In last stitch change to main colour
13 – 20: sc in every st around [10]
Press both layers of arms together so that they lay flat on top of each other, aligning the stitches side by side. sc together the opposite stitches. I put 4sc. Fasten off yarn and leave a long tail to sew.
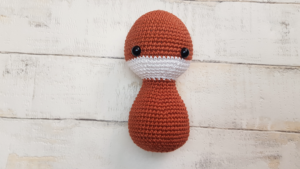
Head and Body:
Start with main colour
1: 6sc in a MR
2: (inc) x6 [12]
3: (sc, inc) x6 [18]
4: (2sc, inc) x6 [24]
5: (3sc, inc) x6 [30]
6: (4sc, inc) x6 [36]
7: (11sc, inc) x3 [39]
8: (12sc, inc) x3 [42]
9: (13sc, inc) x3 [45]
10: (14sc, inc) x3 [48]
11: (15sc, inc) x3 [51]
12: (16sc, inc) x3 [54]
13 – 18: sc in every st around [54]
In the last stitch change to colour white
19: sc in every st around [54]
20: (7sc, dec) x6 [48]
21: (6sc, dec) x6 [42]
22: (5sc, dec) x6 [ 36]
23: (4sc, dec) x6 [30]
24: (3sc, dec) x6 [24]
Insert eyes between row 17-18, leaving 12 sts between them
Stuff the head firm
25: (4sc, dec) x4 [ 20]
In the last st, change back to main colour
26: (4sc, inc) x4 [24]
27: sc in every st around [24]
28: (3sc, inc) x6 [30]
29: sc in every st around [30]
30: (4sc, inc) x6 [36]
31: sc in every st around [36]
32: (5sc, inc) x6 [42]
33: sc in every st around [42]
34: (6sc, inc) x6 [48]
35 – 42: sc in every st around [48]
43: (6sc, dec) x6 [42]
44: (5sc, dec) x6 [36]
45: (4sc, dec) x6 [30]
46: (3sc, dec) x6 [24]
Stuff body firm
47: (2sc, dec) x6 [18]
48: (sc, dec) x6 [12]
49: (dec) x6 [6]
Close the hole, fasten off yarn.
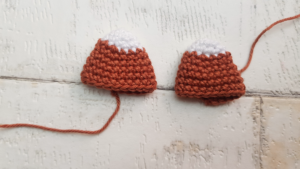
Ear: (make 2)
Start with White colour
1: 6sc in a MR
2: (sc, inc) x3 [9]
3: (2sc, inc) x3 [12]
In last stitch change to main colour
4: (5sc, inc) x2 [14]
5: (6sc, inc) x2 [16]
6: (3sc, inc) x4 [20]
7 – 9: sc in every st around [20]
Fasten off yarn, leave a long tail to sew.
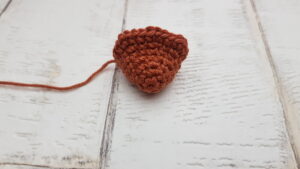
Nose:
Use main colour
1: 6sc in a MR
2: (sc, inc) x3 [9]
3: (2sc,inc) x3 [12]
4: (2sc, inc) x4 [16]
5: sc in every st [16]
6: sc, in next 4 sts, (sc, inc) x4, sc in last 4 sts [20]
7: sc in next 4 sts, (2sc, inc) x4, sc in last 4 sts [24]
Fasten off yarn, leaving a long tail to sew.
Assembling Tommy:
1. Sew the arms to the body between round 28-29
2. Sew the legs to the body between rounds 41-42
3. Sew the ears to the head between row 6-13, bend the ears a little
4. Sew the nose to the head between rounds 18-24. I stuffed the nose a little before sewing it on
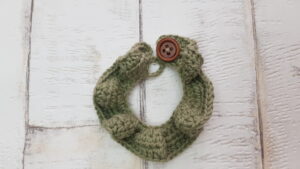
SCARF:
Use colour green
Ch1 at the beginning of every round does not count as a stitch
1: ch 37. starting from 8th chain from hook, put 2 hdc in every st [ 60]
The 7 ch, which created a hook will be the button hole.
2: ch1 turn, (hdc, hdc-inc) x30 [90]
3: ch1 turn, (hdc) x90 [90]
Fasten off yarn and sew a button on.
CONGRATS! You finished Tommy.
I would love to see your finished crochet fox, Tommy. Please share it with me on Instagram. You can find me as @zitaandbunny or click on this icon. ![]()