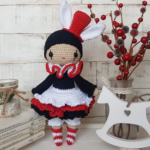
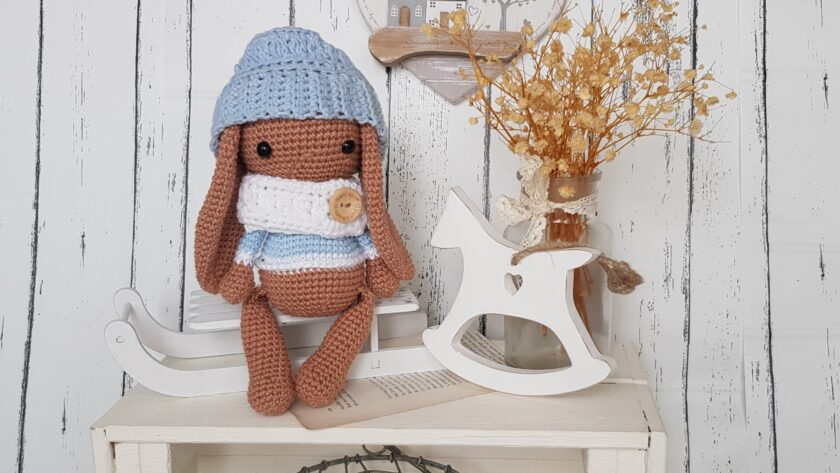
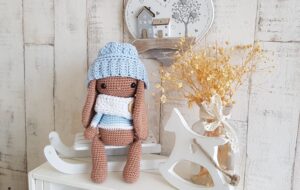
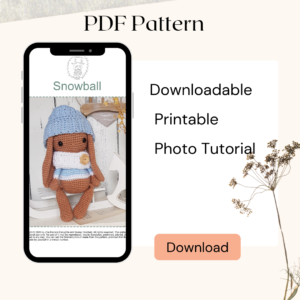
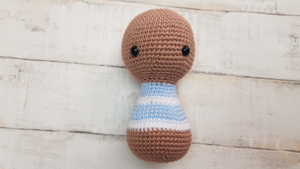
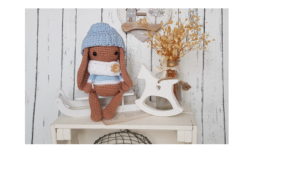
What could be more exiting than making a crochet bunny? Snowball is the cutest crochet bunny with his soft hat and scarf. With this pattern you can learn many different crochet stitches.
Pin it now, make it later!
I mentioned it before, that my obsession for crochet started, when I saw a pretty little crochet bunny. Over the last 3 years nothing really changed, as I still have obsession for crochet bunnies. No matter if it is a toy, a lovey, a rattle, a pin cushion, or anything else, I love them all.
In this toy I combined everything I like in crochet. Floppy ears, hats and full cuteness. Snowball is the first toy I did when I decided to make this blog. I was sure I had to make at least one bunny, but preferably more. I mean who doesn’t love cute bunnies!
My children were amazed with him. Still today, when we have many crochet toys in our house, snowball remains the favourite. My daughter, who wants to be a writer even wrote a little story about him. Here it is:
The story of Snowball
Snowball, the little bunny, loves wondering in the woods, especially at winter. He loves the soft white snow and the beautiful snowdrop flowers. Sometimes he would pick a few for his mother. This year he couldn’t wait for winter, because his friend told him, there will be extra snow.
He was so happy, when it was the middle of December and it started to snow. Unluckily he realized he grew out all of his winter clothes. He could still fit into his stripy woolly jumper, but not his hat and scarf. Snowball was very sad. He watched his brothers and sisters how they played outside. His mother and father tried to cheer him up, but they couldn’t. He couldn’t go outside till Christmas morning. That’s when the magic happened.
When he woke up, he jumped out of his bed and started to shout “It’s Christmas!”
Everyone woke up, went to the living room and checked what they had under the tree. From his stocking, Snowball pulled out a sky blue winter hat and a cotton white scarf. He was so happy. He quickly put them on and rushed outside and played in the snow. “Thank you Santa!” he shouted with joy.
I hope Snowball will bring you as much joy, as it does for me. If you crochet this bunny, please share it with me, as I would love to see him. You can find me on Instagram. ![]()
Caution!
Please be very cautious when you make toys for babies or children under the age of 3. If you sew parts on it, make sure they are secure and safe.
I recommend, to embroider the eyes, as the plastic safety eyes can be dangerous. My tutorial for embroidery eyes can be found here
|
All Zita and Bunny designs are original. Sales of the finished items are encouraged, but please give credit to the designer. Copyright © 2021 by Zita Renata Elek (Zita and Bunny).All rights reserved. This pattern is for personal use only. No part of it may be reproduced, resold, translated, published, altered, shared or posted in any way. |
**This blog contains affiliate links for products I use, believe in, or recommend. This means I will earn a small commission if you make a purchase from one of their links, and of course it is at no extra cost for you. It helps me to keep Zita and Bunny going and to keep publishing free patterns for you. You can check my full disclosure here. **

You can watch the video here:
Abbreviations:
sc – single crochet
inc – increase
dec – decrease
scdec – single crochet decrease
hdc – half double crochet
dc3tog – 3 double crochet together
sc 3rd loop – single crochet in 3rd loop of the stitch
ch – chain
st – stitch
sts – stitches
sl st – slip stitch
MR – magic ring
FLO – front loop only
BLO – back loop only
(…) – repeat instruction for the amount of times given
Materials you need for this crochet bunny:
Affiliate links for the US:
1. Cotton yarn,
I used:
A: Schachenmayr Catania – 437 Sunkissed
B: Scheepjes Catona – 173 Bluebell
C: Schachenmayr Catania – 106 Snow White
D: Yarn Art – 01 Snow White
E: Yarn Art – 75 Baby Blue
3. Safety eyes, 9mm
5. Scissors
7. Pins
8. Stuffing
9.Pom pom if you have one, if not I will show you how to make one
Affiliate links for the UK:
1. CottonYarn:
A: Schachenmayr Catania – 437 Sunkissed
B: Scheepjes Catona – 173 Bluebell
C: Schachenmayr Catania – 106 Snow White
D: Yarn Art – 01 Snow White
E: Yarn Art – 75 Baby Blue
5. Scissors
7. Pins
8. Stuffing
9. Pom pom if you have one, if not I will show you how to make one

Legs: (Make 2 )
Use colour A
1: 6sc in a MR [6]
2: (inc) x6 [12]
3: (sc, inc) x6 [18]
4-6: sc in every st around [18]
7: 3sc, dec, 2sc, 2dec, 2sc, dec, 3sc [14]
8 – 19: sc in every st around [14]
Stuff the legs up to this point, do not stuff the rest
20: (5sc, dec) x2 [12]
21: sc in every st around [12]
22: (4sc, dec) x2 [10]
23: sc in the next 2sts to make sure the 2dec we did in row 7 will be the front of the leg. If you need to make more sts, do so.
Press both layers of legs together so that they lay flat on top of each other, aligning the stitches side by side. sc together the opposite stitches. I put 4sc. Fasten off yarn, leaving a long tail to sew.
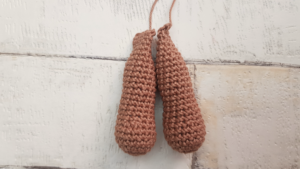
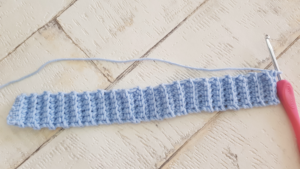
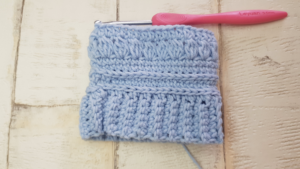
Arms: (Make 2)
Start with colour A – Always change colour in the last st of previous round.
1: 5sc in a MR
2: (inc) x5 [10]
3: (sc, inc) x5 [15]
4 – 5: sc in every st around [15]
6: (sc, dec) x5 [10]
Stuff the arms up to this point, do not stuff the rest.
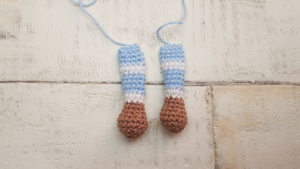
7 – 8: sc in every st around [10] In the last st change to colour C
9 – 10: sc in every st around [10] in the last st change to colour B
11 – 14: sc in every st around [10] in the last st change back to colour C
15 – 16: sc in every st around [10] in the last st change back to colour B
17 – 19: sc in every st around [10]
Press both layers of arms together so that they lay flat on top of each other, aligning the stitches side by side. sc together the opposite stitches. I put 4sc. Fasten off yarn, leaving a long tail to sew
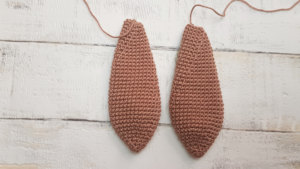
Ears: (make 2)
Use colour A
1: 6sc in a MR [6]
2: (sc, inc) x3 [9]
3: (2sc, inc) x3 [12]
4: sc in every st around [12]
5: (sc, inc) x6 [18]
6: sc in every st around [18]
7: (2sc, inc) x6 [24]
8: sc in every st around [24]
9: (3sc, inc) x6 [30]
10 – 15: sc in every st around [30]
16: (13sc, dec) x2 [28]
17 – 18: sc in every st around [28]
19: (12sc, dec) x2 [26]
20 – 21: sc in every st around [26]
22: (11sc, dec) x2 [24]
23 – 24: sc in every st around [24]
25: (10sc, dec) x2 [22]
26 : sc in every st around [22]
27: (9sc, dec) x2 [20]
28: sc in every st around
29: (8sc, dec) x2 [18]
30: sc in every st around [18]
31: (7sc, dec) x2 [16]
32: sc in every st around [16]
33: (6sc, dec) x2 [14]
34: sc in every st around [14]
35: (5sc, dec) x2 [12]
36: (4sc, dec) x2 [10]
Press both layers of ears together so that they lay flat on top of each other, aligning the stitches side by side. sc together the opposite stitches. I put 4sc. Fasten off yarn, leaving a long tail to sew
Head and Body:
Stuff as you go, always change colour in the last stitch of previous round
Start with colour A
1: 6sc in a MR [6]
2: (inc) x6 [12]
3: (sc, inc) x6 [18]
4: (2sc, inc) x6 [24]
5: (3sc, inc) x6 [30]
6: (4sc, inc) x6 [36]
7: (5sc, inc) x6 [42]
8: (6sc, inc) x6 [48]
9: (7sc, inc) x6 [54]
10 – 19: sc in every st around [54]
20: (7sc, dec) x6 [48]
21: (4sc, dec) x8 [40]
22: (3sc, dec) x8 [32]
23: (2sc, dec) x8 [24]
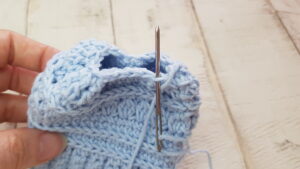
Place safety eyes between row 17-18, leaving 12 sts between them. Stuff head firm
24: (2sc, dec) x6 [18]
25: sc in every st around [18]
26: (2sc, inc) x6 [24] in the last stitch change to colour B
27-28: sc in every st around [24]
29: (5sc, inc) x4 [28]
30: sc in every st around [28] in last st change to colour C
31: (6sc, inc) x4 [32]
32: sc in every st around [32] in the last st change to colour B
33: (7sc, inc) x4 [36]
34: (8sc, inc) x4 [40]
35: (9sc, inc) x4 [44]
36: (10sc, inc) x4 [48] in the last st change to colour C
37 – 38: sc in every st around [48]
39: BLO sc in every st around, in the last st change to colour A [48]
40 – 43: sc in every st around [48]
44: (6sc, dec) x6 [42]
45: (5sc, dec) x6 [36]
46: (4sc, dec) x6 [30]
47: (3sc, dec) x6 [24]
Stuff the body firm
48: (2sc, dec) x6 [18]
49: (sc, dec) x6 [12]
50: (dec) x6 [6]
Fasten off yarn and close the hole.
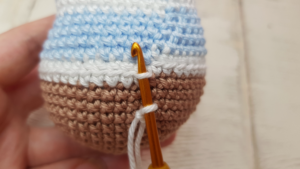
Shirt edge:
Holding the body with head facing down, attach colour C to the 1st FLO in row 38. sc in every FLO. Sl st to 1st sc. Fasten off yarn and weave in end.
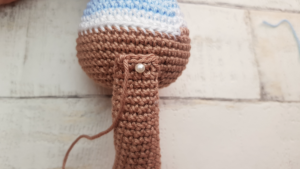
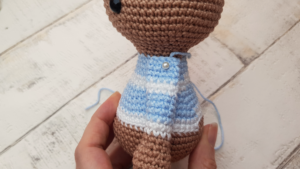
Assembling Snowball, the bunny:
1: sew the arms onto the body to row 28-29.
2: sew the ears onto the head between row 6-7.
3: sew the legs onto the body between row 42-43.
4: sew the nose over 2 stitches between row 18-19.

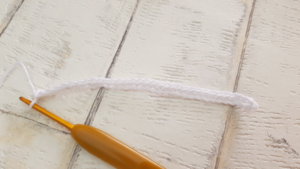
Scarf:
Use colour D,
1: ch 52, starting from 2nd ch from hook
2: hdc x51, [51hdc]
3:: ch4 (count as a dc and a ch1) turn, skip first 2 sts, dc3tog in next st, ch3, skip 3 sts, (dc3tog, ch1, skip 1 st) repeat 22 times, dc in last st [24 x dc3tog, 25x ch1 space, 2x dc]
4: ch2 (count as a hdc) turn, (hdc in ch1 space and hdc in top of dc3tog) 22 times. In ch3 space put 3 hdc. hdc on top of last dc3tog, hdc in ch space, hdc on top of ch3. [51hdc]
Fasten off yarn, and weave in the ends.
Twist the scarf around the neck of the bunny and sew the button on where the button hole is.
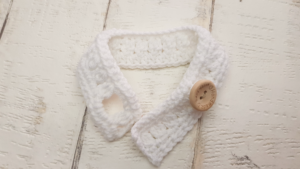
Hat:
Use 3.5mm hook, ch1 and ch2 at the beginning of the round does not count as a stitch
Use yarn E
1: ch7, starting from 2nd ch from hook, (sc)x6,
2 – 40: ch1, turn, (BLO sc) x6 [6]
Fold band in half and slip stitch both sides together to form a headband

1: ch1, place 40 hdc around the edge evenly. sl st to 1st hdc [40 hdc]
2: ch1, sc in 3rd loops in each st around. sl st [40 sc]
3: ch1, (hdc) x40 [40 hdc]
4: repeat row 2 [40 sc]
5: ch1, (sc) x40 [40 sc]
6: ch2, (dc3tog, ch1, skip next st) x20, sl st [20x dc3tog, 20x ch1 space]
7: ch1, hdc on top of dc3tog and in ch1 space, sl st [40hdc]
8: ch1, (sc in 3rd loops) x40, sl st [40sc]
9: ch1, (hdc) x40, sl st [40hdc]
10: ch1, (sc-dec) x20 [20 sc]
Fasten off yarn. With yarn needle weave through front loop of each stitch around. Pull top of hat close. Knot and weave ends to secure hat closure.

Congratulation, you finished Snowball!
I would like to see your finished crochet bunny, Snowball. Please share it with me on Instagram. You can find me as @zitaandbunny or click on this icon. ![]()